
Views: 0 Author: Site Editor Publish Time: 2026-10-19 Origin: Site


Imagine the first warm day of spring. You turn the valve to water your newly planted beds. Instead of a smooth flow, a geyser erupts from a shattered plastic housing. Freezing temperatures have struck again. Trapped moisture just turned into a destructive force. Water expands by roughly nine percent when it freezes. This relentless expansion exerts immense hydrostatic pressure. Unprotected filtration units stand no chance against this physics phenomenon. The result is always the same: expensive and entirely preventable spring repairs.
In this comprehensive guide, we walk through the exact protocols required to protect your equipment. You will learn the mechanical reasons behind freeze damage and discover the right way to drain your system. Furthermore, you will understand why thorough seasonal filter maintenance is critical for extending the lifespan of your agricultural or landscaping infrastructure.
Recent climate data and industry analyses highlight a shifting weather paradigm. Regions historically exempt from deep freezes are now experiencing sudden, severe cold snaps. Consequently, commercial agriculture operations and professional landscapers are abandoning the wait-and-see approach. The new industry baseline is universal, proactive winterization across all hardiness zones. Supply chain delays for replacement parts peak every April. Protecting your gear now ensures you are operational on day one of the growing season.
At its core, winterization is a preventative maintenance protocol. It is designed to protect the delicate filtration components of a watering system from freeze-induced mechanical failure. In practical terms, it involves isolating the unit from the municipal or well water source, relieving internal pressure, extracting all residual moisture, and thoroughly cleaning the internal elements.
The fundamental physics of water makes this process non-negotiable. An irrigation water filter is engineered to be completely airtight and watertight. It offers zero room for thermal expansion. When the temperature drops, the molecular structure of the trapped water changes. The resulting outward pressure exerts massive force against the walls of the filter canister.
If you skip this crucial maintenance step, the risks are substantial. The most common consequence is a ruptured outer housing. This will leak uncontrollably when the network is repressurized. Expanding ice can also warp rubber O-rings, compromising their sealing capability, and blow out the delicate stainless steel mesh inside the unit. Executing a standard winterization routine takes merely 15 minutes per unit. This small time investment saves you from emergency shipping fees and unacceptable downtime.
Performing comprehensive seasonal upkeep does not require highly specialized industrial equipment. However, using the correct tools prevents accidental damage to plastic threads and rubber seals. Gathering these items beforehand ensures a streamlined, frustration-free process.
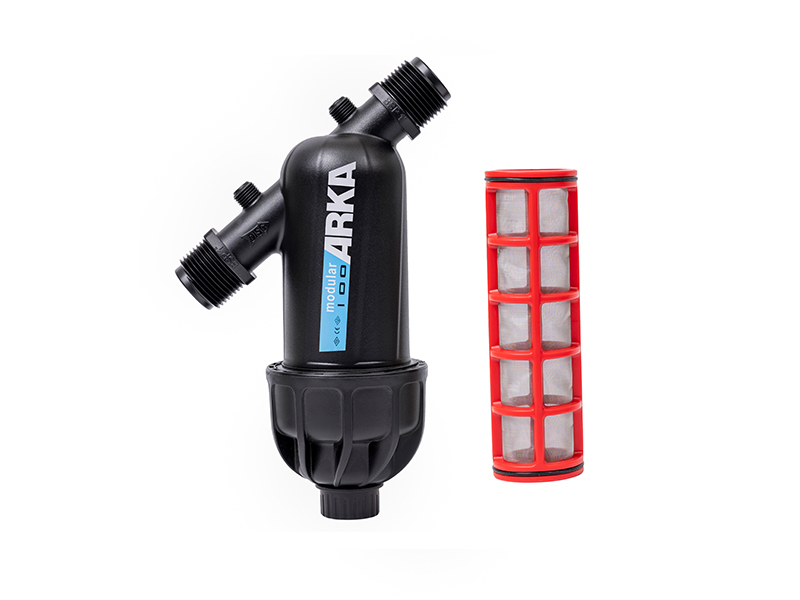
Executing these steps methodically guarantees that your filtration hardware remains intact through the harshest winter conditions. This standardized procedure applies to both screen and disc variations across diverse landscaping applications.
The very first phase of cold-weather preparation is absolute isolation. Locate the main shut-off valve. This is typically situated near the municipal water meter, pump station, or backflow preventer. Turn this valve to the fully closed position. This guarantees that no new water can breach the system while you are working. If your setup utilizes an automated pump relay, disconnect the power supply to the controller to prevent accidental activation.
Even after the main supply is isolated, the internal pipelines and the canister remain highly pressurized. Attempting to unscrew a pressurized housing can result in the heavy plastic component forcefully detaching. To safely bleed the hydrostatic pressure, manually open the flush valve located at the bottom of the unit. Alternatively, activate the lowest-elevation sprinkler zone via your controller. Wait patiently until the water flow reduces to a trickle and you hear the distinct hiss of escaping air.
With the pressure neutralized, carefully unthread the lower canister from the main upper body. If the plastic is difficult to turn due to mineral buildup, apply even torque using your rubber strap wrench. When you pull the housing away, expect a rush of cold, dirty water to spill out. Empty this residual water completely. Keep a close eye on the large black O-ring that seals the assembly. It often slips out and can easily disappear into the mud below.
Slide the internal element out of the main body. Submerge the dirty screen in a bucket of warm water mixed with your descaling solution. Allow it to soak for about 15 minutes to break down stubborn calcification. Afterward, use your soft-bristle brush to gently scrub away embedded silt and rust particles. Rinse the element thoroughly with clean water and let it air-dry completely on a towel. Storing a damp screen promotes aggressive mold growth during the dark winter months.
Rubber components are notoriously susceptible to degradation when exposed to cold, dry winter air. Inspect the main housing O-ring and any smaller internal seals for micro-tears or flattening. Assuming they are structurally intact, wipe them clean with a damp cloth. Apply a generous coating of silicone lubricant. Work it into the rubber with your fingers. This specialized grease keeps the material supple, prevents dry-rot, and ensures a flawless watertight seal for spring reassembly.
Never leave the empty plastic housing, the cleaned screen, or the lubricated O-rings exposed to the outdoor elements. Even devoid of water, extreme sub-zero temperatures cause polymer plastics to become brittle and prone to impact damage. Place the dry filter element back inside the housing, drop the O-ring inside, and loosely thread the canister together. Store this assembled unit indoors until the threat of frost has entirely passed.
Performing routine maintenance is only effective if executed with precision. Many property owners inadvertently destroy their own equipment by applying improper techniques. Understanding the mechanical reasons behind these common errors will save you from unnecessary replacement costs.
A standard procedure for clearing underground irrigation lines involves using an air compressor to force residual water out of the emitters. A critical error is leaving the filter housing fully assembled during this blowout process. Compressed air moves at a vastly higher velocity than water. When high-pressure air hits a partially clogged screen, it acts as a projectile mechanism. It forces trapped sand deep into the micro-pores of the mesh. In severe cases, this pneumatic pressure exceeds the structural tolerance of the screen, causing massive blowouts.
During winter storage, rubber gaskets are prone to shrinking and cracking. To combat this, property owners often reach for common household lubricants like WD-40 or motor oil. This is a fatal mistake for your seals. Most standard irrigation O-rings are manufactured from EPDM or Nitrile rubber. Petroleum-based products trigger a chemical reaction with these specific rubbers. They will swell, become gummy, and eventually disintegrate. Always verify that your maintenance grease is strictly silicone-based.
For certain hard-plumbed systems where the main canister cannot be entirely removed for indoor storage, draining the water in place is the only option. However, simply turning off the water supply does not empty the unit. If the flush valve remains closed, a significant volume of moisture stays trapped inside the lower bowl. Even a small pocket of trapped water can generate enough outward force to crack heavy-duty plastic housings. Always leave the flush valve in the fully open position throughout the winter.
Winterizing presents the perfect opportunity to conduct a thorough physical inspection of your infrastructure. Because the unit is already dismantled and cleaned, identifying structural fatigue becomes much easier. Catching these issues now ensures you do not reinstall compromised equipment that will inevitably fail under the maximum hydraulic load of the summer heat.
Before placing your components in a box for the season, examine them under bright lighting. Look closely at the threaded areas and the base of the canister for white stress marks or cloudy hairline fractures. These micro-fractures will expand under pressure, leading to catastrophic leaks. Next, hold the screen up to a light source. Look for irregular holes, frayed nylon strands, or separated seams where the mesh meets the plastic skeleton. A compromised screen allows coarse debris to bypass the barrier, which will quickly clog your downstream drip emitters.
| Component | Sign of Wear | Consequence if Ignored | Action Required |
|---|---|---|---|
| Polymer Housing | White stress marks, hairline cracks | Catastrophic blowout under summer pressure | Replace entire housing immediately |
| Mesh Screen | Irregular holes, separated seams | Debris bypasses filter, clogging downstream emitters | Replace internal element |
| O-Ring Seal | Flattened profile, micro-tears, gummy texture | Continuous dripping, loss of system pressure | Discard and install new silicone-lubricated O-ring |
If your inspection reveals that the current unit is structurally compromised, winter is the strategic time to procure a replacement. When evaluating new equipment, prioritize robust construction and an accessible architecture that simplifies future maintenance.
For residential landscapes or mid-sized agricultural plots, upgrading to a specialized 3/4 Inch Y Screen Filter provides superior particulate extraction. Let us look at the engineering specifications that matter. A high-quality model features a 120-mesh stainless steel screen capable of filtering out 130-micron debris. It should effortlessly handle a maximum flow rate of 5 cubic meters per hour and withstand working pressures up to 8 bar. Models featuring a Y-body design are specifically engineered for efficient debris flushing. This architecture allows simple disassembly without requiring you to dismantle the entire plumbing manifold. Utilizing heavy-duty polymers that resist cracking better than entry-level alternatives, this upgrade ensures your system is resilient and ready for immediate deployment.
Deciding whether to manage the winterization process internally or contract a professional landscaping service depends heavily on the scale and complexity of your water delivery system.
Managing the process yourself is highly practical for small to medium-sized residential properties. If your setup consists of a few raised garden beds, a single-zone drip line, or an easily accessible above-ground valve manifold, the risks are minimal. The DIY approach is appropriate when the components operate on standard municipal water pressure and you possess basic hand tools. Homeowners can comfortably execute this process in under half an hour.
Conversely, sprawling agricultural setups and commercial properties usually require professional intervention. Clearing miles of underground PVC networks requires tow-behind air compressors capable of delivering high Cubic Feet per Minute at a regulated, low PSI. Standard garage compressors simply lack the volume to push water out of long lines effectively. Because professional blowouts require precise pressure regulation to avoid rupturing subterranean pipes, it is safer to hire licensed technicians.
The careful steps taken during the autumn months pay massive dividends when the frost finally clears. Reinstalling a properly stored unit is a straightforward process, but it requires strict attention to detail to prevent startup leaks and hydraulic shock.
When bringing the system back online, retrieve your components from storage. First, verify that the housing groove is free of dust. Apply a fresh coat of silicone lubricant to the O-ring and seat it evenly in the groove. A pinched O-ring is the primary cause of immediate blowouts. Insert the clean element, ensuring it locks into the designated alignment tabs.
Crucially, you must hand-tighten the housing. Using wrenches to tighten the canister often leads to over-torquing, which stresses the plastic threads. Finally, when reopening the main water supply, turn the valve incredibly slowly. Rushing this step sends a high-velocity surge of water and trapped air through the empty pipes. This violent hydraulic shock, known as water hammer, can instantly shatter housings on impact. Gradually introducing pressure over a period of 60 seconds ensures a safe start to the season.
Proper cold-weather preparation saves money, prevents endless frustration, and stops freezing water from destroying vital components. Taking the time to properly drain, clean, and store your system is a basic yet essential practice for any property owner. Use the dormant season to check your equipment for stress fractures. Do not hesitate to replace damaged units with durable new models. By proactively managing your irrigation water filter, you protect your landscaping investment long before the bitter cold arrives. If your current setup is showing its age, head over to ARKA Irrigation to explore professional-grade filtration solutions tailored for ultimate durability and performance.
No. Insulation does not generate heat. It merely slows the transfer of thermal energy. During prolonged sub-zero temperatures, the ambient cold will eventually penetrate the insulation, and the trapped water will freeze. Complete removal and drainage is the only empirically proven method to prevent expansion damage.
It is highly recommended to store the removed components indoors in a climate-controlled environment. If the main body is hard-plumbed and cannot be removed from the exterior pipes, you must leave the flush valve open and the main canister loosely unscrewed. This allows any residual condensation to evaporate and provides room for expansion if small pockets of moisture freeze.
With meticulous seasonal upkeep, a high-quality stainless steel or reinforced nylon screen can last between three to five years. You should only replace the screen when you observe physical tears, irreversible mineral scaling that cannot be removed with descaling solutions, or structural warping of the plastic skeleton.
The fundamental process for the filter itself is identical. Both require isolation, drainage, cleaning, and dry storage. However, the broader system winterization differs. Drip systems operate at lower pressures and often utilize automatic drain valves, whereas traditional high-pressure sprinkler systems typically require forced air blowouts to clear the lateral lines effectively.
Do not wait for the first hard freeze. As a general rule, initiate your winterization protocols when nighttime temperatures consistently drop to 40 degrees Fahrenheit. This provides a safe time buffer to complete your maintenance before sudden, unexpected sub-zero drops occur.
Absolutely. Removing the filtration unit only protects the housing itself. The downstream underground PVC pipes, manifold valves, and emitters still hold residual water. You must utilize a proper air compressor blowout method to clear the entire subterranean network, otherwise, the expanding ice will shatter your buried pipes.


