
Views: 0 Author: Site Editor Publish Time: 2026-10-12 Origin: Site


Are you struggling with persistently cloudy pool water despite maintaining perfectly balanced chemicals? Imagine hosting a summer backyard gathering, only to find your guests greeted by murky, uninviting water. Guessing your media levels usually causes poor filtration. Worse, it permanently damages your expensive equipment. To maintain a pristine swimming environment, you need precise measurements and a solid understanding of fluid dynamics.
Over the past few years, the water treatment industry has seen a massive shift toward operational efficiency. Facility managers and homeowners alike are moving away from manual guesswork. Stricter water conservation guidelines demand systems that waste less water during cleaning cycles. The market is rapidly adopting automated backwashing systems and advanced media alternatives. This evolution means modern operators must understand exactly how their vessel capacity interacts with these new materials to maximize energy savings and water clarity.
To maintain safe swimming conditions, precise equipment calibration is non-negotiable. A sand media filter operates on a highly sensitive hydraulic principle. Water enters the top of the tank. The pump then pushes it downward through a dense bed of particles. The jagged edges of these grains trap dirt, body oils, and environmental debris. The purified water then enters the lateral assembly at the bottom and returns to the pool. Disrupting this delicate balance with an incorrect volume causes total system failure.
The Danger of Underfilling: When a tank lacks sufficient media, incoming water naturally seeks the path of least resistance. Field engineers call this channeling. High-pressure water carves direct tunnels through the shallow layers instead of spreading evenly. The water bypasses the purification process entirely. It returns to the pool just as dirty as when it left. This is the primary culprit behind water that simply refuses to clear up.
The Danger of Overfilling: Adding too much material is equally destructive. Every tank requires a specific amount of empty space at the top. We call this the freeboard. This void allows water to disperse evenly before hitting the bed. It also provides crucial room for the bed to lift and expand during a cleaning cycle. Overfilling eliminates this space. Excess grains will blow directly back into the pool through your return jets. Even more alarmingly, this lack of expansion room causes severe internal pressure spikes. I have seen these spikes rupture lateral assemblies and crack solid fiberglass shells.
Determining the correct volume is never a matter of estimation. It is a strict measurement based on the internal capacity of the vessel. The most reliable metric for residential and commercial setups is the tank diameter. Below is a practical selection guide detailing typical weight requirements alongside commercial-grade specifications.
| Tank Diameter | Application Scenario | Standard Silica Weight | Optimal Flow Rate |
|---|---|---|---|
| 16 Inches | Small above-ground pools | 50 lbs | 35 GPM |
| 22 Inches | Medium in-ground pools | 200 lbs to 250 lbs | 60 GPM |
| 24 Inches | Standard in-ground pools | 300 lbs | 70 GPM |
| 36 Inches | Light commercial facilities | 600 lbs | 130 GPM |
| 40 Inches or 1000mm | Heavy-duty commercial or irrigation | 1200 lbs to 1400 lbs | Up to 200 GPM |
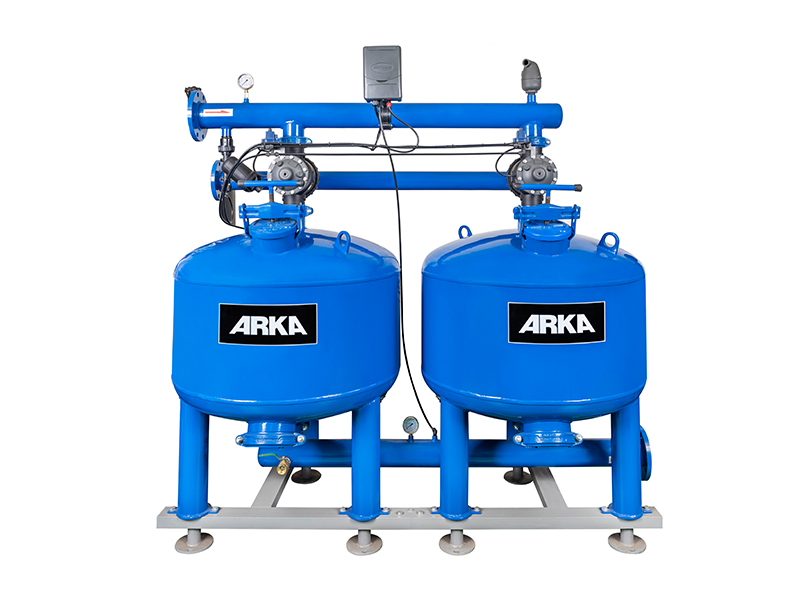
Always verify your specific equipment requirements. Locate the manufacturer data plate on the side of your unit. This label displays the model number, maximum operating pressure, and the exact pounds required. For industrial applications, units like the Arka F40-2-1000mm require precise media loading to handle high-volume agricultural and commercial water treatment effectively.
Driven by eco-friendly demands, operators are migrating away from traditional silica. Modern materials reduce water waste and capture microscopic pathogens more effectively. When calculating requirements, you must account for the specific gravity of your chosen filtration media. Total weight fluctuates based on material density.
Standard Silica Sand: Number 20 silica remains the traditional choice. It is mined specifically for aquatic purification. The particles measure roughly 0.45 to 0.55 millimeters. This size effectively traps debris down to 20 to 40 microns. It strictly adheres to standard weight charts provided by manufacturers.
Recycled Glass Media: Crushed glass is a highly efficient upgrade. Glass particles hold a negative charge, naturally attracting microscopic debris down to 5 microns. Glass is also less dense than silica. If your tank requires 300 lbs of traditional silica, you typically only need about 240 lbs of glass. This represents a standard 20 percent reduction in weight.
Zeolite: Zeolite is a porous volcanic mineral offering exceptional clarity. It traps particles as small as 3 microns. Its unique molecular structure also captures chloramines, the irritating byproducts causing strong chemical odors. Zeolite is incredibly lightweight. A vessel requiring 200 lbs of traditional media needs only about 100 lbs of zeolite.
Even premium materials degrade over time. Constant water friction smooths the jagged edges of the grains. Once rounded, the bed can no longer capture debris. Look for these objective field indicators to know when your system needs an overhaul.
Replacing the internal components demands precision. Mishandling fragile plastics leads to costly repairs. Follow this standard operating procedure for a safe and effective swap.
Secure Power and Drain: Safety is paramount around aquatic electrical equipment. Shut off power at the main breaker. Locate the bottom drain plug and remove it. Let the vessel drain completely. Wet material resembles dense sludge and is incredibly difficult to extract manually.
Remove the Control Valve: Carefully disconnect the plumbing unions attaching the pump and return lines. Remove the clamp securing the valve. Lift the valve straight up. Pulling aggressively can snap the central standpipe located directly beneath it.
Extract the Degraded Material: Never attempt to tip a heavy vessel over. Use a heavy-duty shop vacuum to extract the degraded material. Proceed with extreme caution as you reach the bottom. The lateral assembly is highly fragile. Snapping a plastic lateral with a vacuum nozzle guarantees debris will leak directly into your pool upon startup.
Protect the Laterals: Rinse the interior with a hose and inspect for hairline cracks. Reinstall the drain plug. Fill the empty tank halfway with water. This creates a vital shock-absorbing cushion. Pouring hundreds of pounds of dry material directly onto unprotected plastics will crush them.
Add the Exact Volume: Precision here dictates future performance. Cover the top opening of the standpipe with duct tape. If material enters this pipe, it bypasses the purification process. Carefully lower the bags into the water cushion. Distribute the weight evenly to keep the standpipe perfectly centered.
Prime and Flush: Remove the tape, clean the O-ring, and reattach the valve. Turn the power back on. Run a flush cycle for three minutes to remove fine dust particles. Follow up with a one-minute rinse cycle to settle the bed before returning to standard operation.
For facility managers seeking to reduce manual labor, upgrading the hardware is the most logical step. Traditional setups require users to physically monitor gauges and turn heavy valves.
Modern technology eliminates this hands-on requirement. An automatic sand filter like the Arka F40 series utilizes automated multiport valves equipped with electronic pressure sensors. When internal pressure reaches a predetermined threshold, the system automatically shuts off the pump, switches the valve position, flushes the debris, and resumes operation. This automation ensures peak efficiency and prevents high-pressure spikes that cause equipment fatigue.
Proper care prevents calcification and keeps internal mechanisms functioning smoothly. Field experience shows that proactive maintenance doubles the lifespan of your hardware.
Master the Pressure Gauge: Never clean your water treatment filter on a fixed weekly schedule. Cleaning too frequently prevents the bed from building up a slight dirt layer, which actually helps trap finer particles. Initiate a flush only when the gauge reads 8 to 10 PSI higher than the clean baseline.
Perform Annual Degreasing: Regular flushing removes loose dirt but cannot dissolve baked-on body oils or sunscreen. Once a year, introduce a specialized degreaser into the tank. Let it soak overnight to break down stubborn contaminants.
Strict Winterization: In freezing climates, water left inside will expand and crack the fiberglass shell. Remove the bottom plug, set the valve to the open position, and use an air compressor to blow out internal plumbing lines before the first freeze.
No. Play sand and construction sand are fundamentally incompatible with aquatic systems. Play sand lacks the jagged edges required to trap microscopic debris. It contains impurities and is far too fine. It will easily pass through the laterals, bypass the purification process entirely, and blow directly into your pool. You must use specifically graded Number 20 silica or a verified commercial alternative.
This depends entirely on the size and specifications of your vessel. For larger commercial units typically exceeding 30 inches in diameter, manufacturers often recommend placing a layer of pea gravel at the bottom. This covers the laterals before adding the primary media. The gravel helps distribute water flow evenly and prevents finer particles from blocking the lateral slots. For standard residential units, pea gravel is usually unnecessary. Always defer to your manufacturer manual.
The most obvious sign of a broken lateral is a constant pile of fine granular debris accumulating on the floor of your pool, usually directly under the return jets. If vacuuming the debris only results in it returning a few hours later, a plastic lateral tube at the bottom of your tank has likely cracked. The vessel must be emptied and the lateral assembly replaced immediately.
Mixing different materials like silica and glass is highly discouraged. Different materials have varying densities and specific gravities. During a cleaning cycle, lighter materials will separate from heavier ones, destroying the uniform bed required for proper hydraulic function. Always stick to one uniform type of material per vessel.
Overfilling eliminates the freeboard. Without this empty space at the top of the tank, water cannot distribute evenly over the bed. The immediate result is excess grains blowing back into the water through the return jets. It will also cause a severe spike in internal pressure and significantly reduce the effectiveness of your cleaning cycles.
Flushing out debris should never be performed on a strict calendar schedule. It must be dictated by the pressure gauge. Run a cycle only when the pressure reading is 8 to 10 PSI higher than your clean starting pressure. Cleaning too often prevents the bed from reaching its maximum efficiency. Waiting too long can damage the pump motor.
Knowing the exact volume required for your equipment is a non-negotiable aspect of responsible water management. Accurate calibration ensures a clean swimming environment while protecting your expensive hardware from unnecessary hydraulic strain. Always check your specific manufacturer label first. Choose your materials wisely to align with your water quality goals. If you are managing larger facilities or seeking to eliminate manual maintenance, upgrading to intelligent, self-cleaning systems is the best investment you can make. Explore the advanced automated filtration solutions at Arka Irrigation to drastically reduce your maintenance labor and enjoy crystal-clear water all season long.


