
Views: 0 Author: Site Editor Publish Time: 2026-10-29 Origin: Site


Are clogged emitters ruining your crop yield? Debris easily destroys unprotected watering systems. A 2-inch mesh screen filter irrigation line setup solves this persistent issue. Whether you manage a large-scale agricultural project or a sprawling commercial landscape, water quality dictates the reliability of your infrastructure. In this comprehensive guide, you will learn the exact installation protocols and essential maintenance routines required to protect your investment.
Recent agricultural trends highlight a massive shift toward precision water management. Prolonged droughts force growers and facility managers to utilize marginal water sources. Reclaimed wastewater and lower-aquifer wells are now common. Consequently, the demand for robust physical filtration has skyrocketed. Industry analysts note that upgrading to high-capacity physical barriers reduces long-term maintenance overhead by up to 40 percent. A reliable screen filter prevents the microscopic abrasions that prematurely destroy expensive flow meters and solenoid valves.
Agricultural and commercial watering systems rely on absolute precision. Components such as drip tapes and micro-sprinklers feature extremely narrow orifices. These openings often measure less than 0.02 inches in diameter. When drawing water from open reservoirs or municipal lines, suspended inorganic particles like sand, silt, and pipe scale travel rapidly through the mainlines.
Picture this. You walk your rows mid-summer and find an entire crop block wilting. The culprit? A single grain of sand jammed the primary emitter. Without a physical barrier, particulates accumulate rapidly inside your hardware. This causes irregular water distribution and localized drought stress on plants. Eventual hardware failure is inevitable. By trapping debris before it reaches the lateral lines, the element preserves the structural integrity of the entire downstream infrastructure.
System flow rate dictates the required pipe and housing sizing. A 2-inch diameter is widely considered the optimal standard for balancing high water volume with efficient particle capture. Smaller units restrict flow. This causes a significant pressure drop that forces pumps to work harder and accelerates mechanical wear. Conversely, oversized housings can be unnecessarily expensive and difficult to position in tight manifolds. A standard 2-inch unit typically accommodates flow rates between 50 and 120 Gallons Per Minute. This ensures water moves through the mesh at a velocity fast enough to supply large zones, yet slow enough to capture suspended solids effectively.
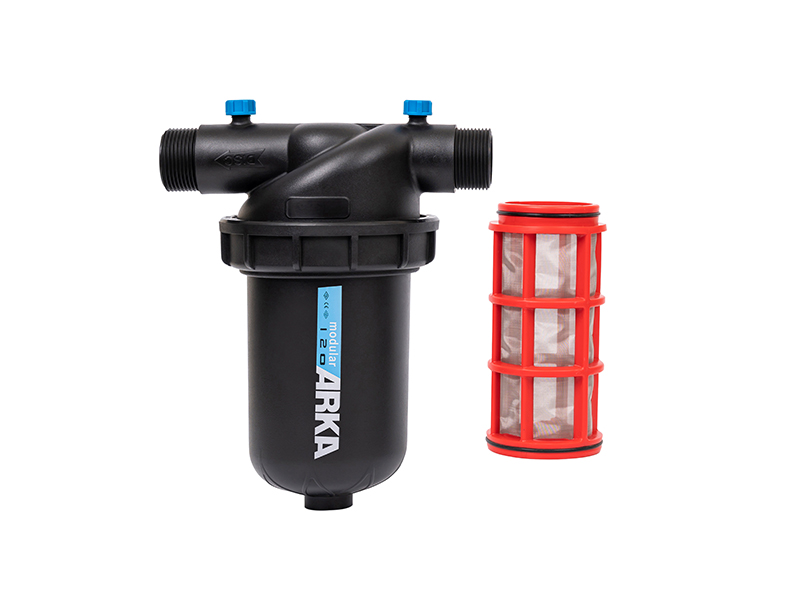
Selecting the correct housing geometry is just as important as choosing the medium itself. The physical design determines maintenance requirements, installation footprint, and overall hydraulic efficiency. Engineers look closely at standard models versus high-performance variants.
For example, industrial-grade models like the F40TSX T-Type Plastic Screen Filter offer a 1-to-2-inch configuration designed specifically for demanding farm systems. These units typically handle maximum operating pressures up to 120 PSI and provide exceptional flow rates. Let us break down the core differences between the primary designs.
| Filter Type | Design Feature | Best Application Scenario | Maintenance Efficiency |
|---|---|---|---|
| T-Type | Cartridge sits perpendicular to water flow, creating a "T" shape. | Large-scale agricultural operations requiring high capacity. | Excellent. Allows cartridge removal without dismantling the mainline pipe. |
| Y-Type | Cartridge is angled at 45 degrees to the mainline. | Tight installation spaces or retrofitting crowded manifolds. | Good. Aerodynamic design minimizes pressure loss but requires more frequent flushing. |
| Inline | Element housed directly along the axis of the pipe. | Compact residential or light commercial setups. | Fair. Often requires system depressurization and partial disassembly for deep cleaning. |
The T-type configuration is specifically engineered for high-capacity applications. This structure provides a significantly larger surface area compared to standard models. A larger surface area directly translates to extended intervals between cleanings. Furthermore, a high-quality T-type screen filter remains the preferred choice for operations where system downtime must be strictly minimized.
The effectiveness of your setup depends entirely on selecting the appropriate specifications. Mesh refers to the number of openings per linear inch. Micron refers to the actual size of the particles that can pass through. As the mesh number increases, the micron size decreases.
Proper installation requires precise plumbing materials to prevent leaks under dynamic pressure. Ensure you have PVC Primer and heavy-duty PVC Cement on site. Do not skimp on the Teflon tape. Cheap tape shreds under pressure and leads to micro-leaks. You will also need a ratcheting PVC pipe cutter, a deburring tool, two 2-inch PVC unions, and high-quality ball valves. Grab liquid-filled pressure gauges rather than dry ones. Dry gauges vibrate violently in pump houses and fail quickly.
Safety and spatial planning take precedence. Completely shut off the main water supply. Open a downstream valve to bleed residual pressure from the lines. Map out the exact physical location. You must leave enough room to unscrew the housing cap and slide the internal cartridge out entirely without hitting the ground.
Using a ratcheting pipe cutter, make clean and square cuts on the 2-inch PVC mainline. A straight cut ensures maximum surface contact inside the fittings. Use a deburring tool to remove all plastic shavings from the pipe edges. Any loose PVC shavings left behind will immediately flush into your new system upon startup.
Never glue a housing directly into a mainline. Always use PVC unions on both the inlet and outlet sides. Unions allow you to completely remove the assembly for winterization without touching a saw. Wrap the male threads with four to six layers of high-density Teflon tape. Thread the adapters into the ports carefully to avoid cross-threading.
This next step is the most critical mechanical requirement. Every inline filter features a molded arrow on its exterior indicating the required direction of water flow. The water must enter the inside of the cylinder and push outward. If installed backward, debris will accumulate on the exterior. This causes the cylinder to collapse inward under pressure, permanently destroying the cartridge.
The sequence of components in a manifold is dictated by hydraulic principles and local plumbing codes. The optimal sequence starts with the main water source. The backflow preventer follows immediately to protect potable water. Next comes the fertilizer injector if your system uses one. Filtering after injection prevents undissolved fertilizer from clogging emitters.
Finally, install your irrigation line filter just before the mainline and zone valves. This ensures that the internal diaphragms and solenoids of the valves remain protected from abrasive debris. Installing above ground provides the easiest access for visual inspection. However, these installations must be shielded from direct UV degradation and freezing temperatures. If burying the unit, utilize a Jumbo rectangular valve box. Line the bottom with washed gravel to facilitate rapid drainage.
Field data consistently highlights a few recurring errors that compromise system integrity. Avoiding these missteps ensures peak efficiency without requiring premature repairs.
In commercial agriculture, downtime directly translates to drought stress for plants. A frequent oversight is plumbing the unit directly into the mainline without a bypass loop. A bypass line consists of parallel piping and isolation valves that allow water to route around the housing temporarily. If your mesh filter sustains damage or requires a deep chemical soak, the bypass line permits emergency watering to continue.
Most modern housings are constructed from high-density polymers. While highly resistant to chemical corrosion, these materials remain susceptible to mechanical stress. Installers accustomed to working with galvanized steel often apply excessive torque using large pipe wrenches. Over-tightening creates microscopic stress fractures in the female port. Fluctuating water pressure causes these micro-fractures to propagate into major splits. Apply standard Teflon tape and hand-tighten the fittings.
Woven wire is incredibly effective at capturing inorganic, rigid particulate matter like sand and scale. However, deploying this technology as the primary defense against heavy organic loads is a critical misapplication. If your water source is a surface pond rich in algae, a standard weave will rapidly blind. Organic matter extrudes through the rigid square openings under pressure. In these scenarios, implement a disc setup for the organic load, utilizing the wire unit only as a secondary safeguard.
The operational efficiency of your setup depends entirely on a structured maintenance regimen. Neglected hardware causes severe pressure drops and reduces emitter flow rates.
Routine flushing is the first tier of maintenance. It expels loose particulate matter before it embeds deeply. Keep the system running so the line remains fully pressurized. Open the base flush valve for 15 to 30 seconds. The internal pressure will forcefully eject the accumulated debris out of the purge port. Close the valve once the discharge water runs completely clear.
Over a standard growing season, mineral scale and biofilms will adhere to the stainless steel. When the pressure differential between your upstream and downstream gauges exceeds 7 PSI, manual deep cleaning is mandatory. Isolate the unit by closing the ball valves. Unscrew the cap and extract the cartridge. Using a soft-bristled nylon brush and warm water, gently scrub the cylinder from the outside in. Brushing from the inside forces embedded particles further into the weave. Never use wire brushes.
In regions subjected to freezing temperatures, winterization is a non-negotiable step. Shut off the main water supply and open all bypass lines to allow gravity drainage. Unscrew the lower housing to empty all standing water. Remove the cartridge entirely and store it indoors during the winter months.
A properly installed 2-inch filtration system acts as the ultimate insurance policy for your watering infrastructure. It stops abrasive debris in its tracks. By strictly following directional arrows, utilizing PVC unions, and integrating a bypass loop, you ensure that your water flows smoothly season after season. Regular flushing and deep cleaning routines will drastically extend the lifespan of your equipment. Always rely on your pressure gauges to shift from reactive repairs to proactive maintenance.
Ready to upgrade your infrastructure? Explore high-performance, industrial-grade filtration solutions at Arka Irrigation to find the exact match for your agricultural or commercial watering needs.
Yes, this setup is highly compatible with drip irrigation, provided the micron rating is correctly specified. Drip emitters have microscopic flow paths that are easily obstructed. Standard industry practice requires a filtration level of 120 to 150 mesh to adequately protect drip tapes and micro-sprinklers. Always cross-reference your hardware rating with the minimum requirements published by your emitter manufacturer.
While exact specifications vary by manufacturer and design, a standard 2-inch plastic housing typically supports a maximum flow rate between 50 and 120 Gallons Per Minute. T-type configurations generally handle higher volumes more efficiently than standard inline models. Pushing flow rates beyond the manufacturer limit will result in severe friction loss and potential structural failure.
Cleaning frequency is entirely dependent on the physical properties of your water source. Systems drawing from treated municipal supplies may only require a visual check and flush once a month. Conversely, systems utilizing well water with high sand content may require weekly flushing. The most objective way to determine cleaning frequency is by monitoring your liquid-filled gauges. A pressure drop of 5 to 10 PSI across the unit is the definitive indicator that cleaning is required.
Check the exterior housing for a molded directional arrow. This arrow must point in the exact direction of the water flow traveling toward your crops. If installed backward, you will notice a rapid and severe drop in water pressure shortly after startup. Upon opening the housing, debris will be packed tightly on the outside of the cylinder rather than trapped safely inside it, which can crush the internal cartridge.
These two technologies utilize different physical mechanisms to separate debris. A woven screen provides surface filtration. It acts as a single physical barrier that stops rigid, inorganic particles like sand and scale. A disc variant provides depth filtration. It utilizes a stack of tightly compressed, grooved plastic discs to create a three-dimensional matrix. Disc technology is objectively superior for trapping soft, organic matter like algae.
Yes, introducing any obstruction into a hydraulic system causes a slight reduction in pressure, known as friction loss. A brand-new, perfectly clean unit will typically cause a negligible pressure drop of 1 to 3 PSI as water navigates the internal geometry. As debris accumulates, this pressure drop steadily increases. If you experience a severe pressure reduction immediately upon installation, the unit is likely undersized for your pump capacity.


